Кіраванне файламі cookie, якія выкарыстоўваюцца для рэкламы, такіх як персаналізацыя рэкламы, рэмаркетынг і аналіз эфектыўнасці рэкламы.
3.6.7. Configure domain for Zoho Mail
Attention!
The domain must be serviced on our NS. If the domain is serviced on third-party NS, actions need to be performed not with us, but in the panel of their owner.Automatic setup
Use presets from the "Zoho" group.
Manual setup
Zoho is an online service that provides its own email service. To ensure its correct operation, it is necessary to configure the domain — confirm it, direct it to Zoho's MX records, and create SPF and DKIM records.
- Go to the Mail application in the general list of applications:

- Next to the field "Add existing domain," click "Add now":

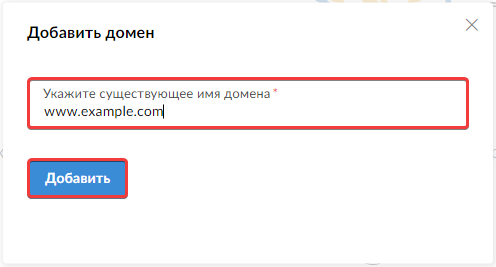
- Enter the domain name and click "Add":
- After adding the domain, click the "Proceed to domain verification" button and verify the domain using one of the methods:
- Add users and create groups if required.
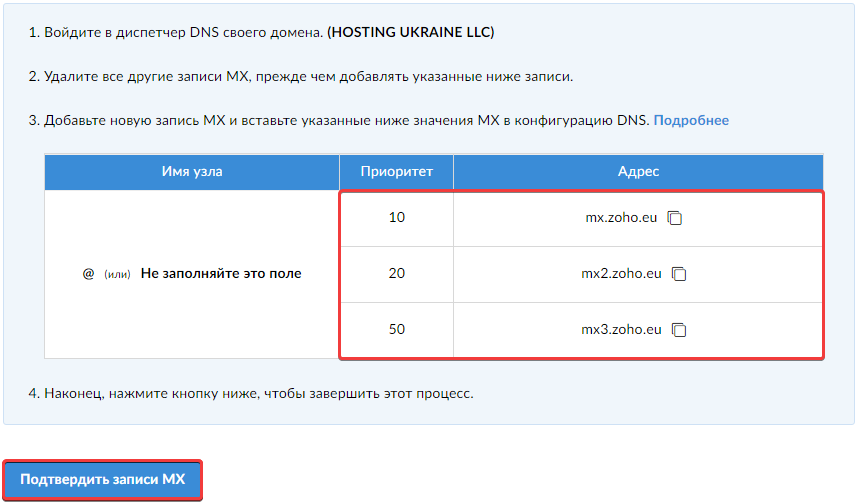
- To start receiving emails in mailboxes hosted on the Zoho service, it is necessary to change the domain's MX records. ⚠️ After changing the MX records, emails will stop being delivered to the mailboxes hosted on our server. Set the MX records suggested by the service and wait for the DNS cache to update. This usually takes several hours (up to a maximum of 24). After this, click "Confirm MX records." The necessary MX records will be displayed on the page in a table format:
- Add an SPF record with the following data:
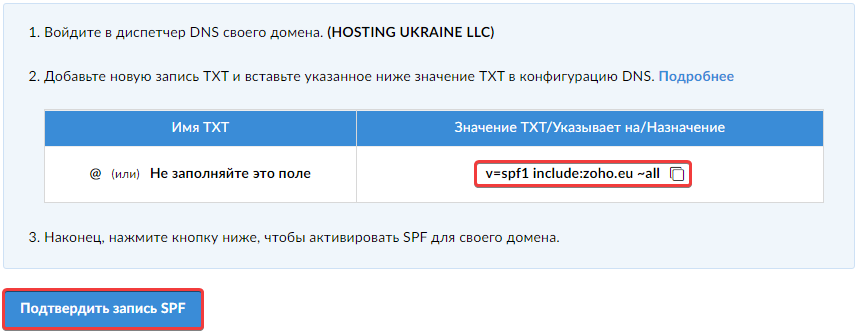
- "Subdomain" — if a subdomain has been added in the Zoho service, then its name; if the service is intended to be used for the main domain, the symbol
@. - "Type" — "TXT".
- "Data" — data from the "TXT Value" field (if emails are planned to be sent from our servers, add
include:_spf.ukraine.com.uabefore~all). - Wait for the DNS cache to update. This usually takes several hours (up to 24 hours maximum). After that, click "Check SPF record" or perform the check later.
- Add a DKIM record with the following data:
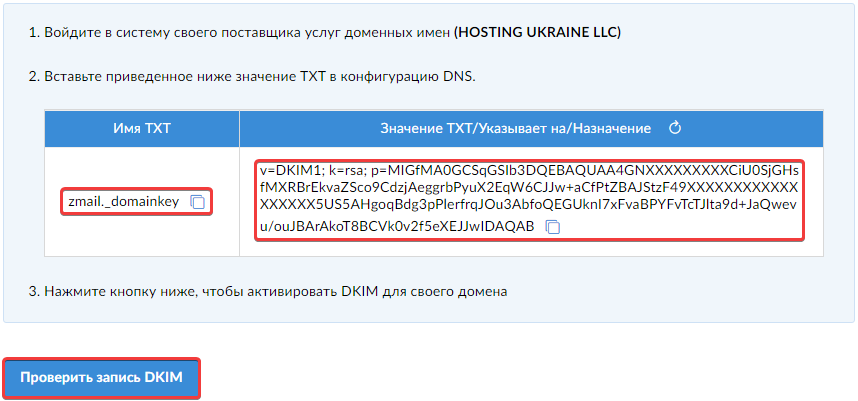
- "Subdomain" —
zmail._domainkey, and if a subdomain was added in the service, the selector name should be appended with the subdomain name at the end. - "Type" — "TXT".
- "Data" — data from the "TXT Value" field.
- Wait for the DNS cache to update. This usually takes several hours (up to 24 hours maximum). After that, click "Check DKIM record" or perform the check later.
- Make the remaining service settings.
Verify using TXT record
- Select the confirmation method "TXT" and copy the value from the "Value/Points to/Destination" field:
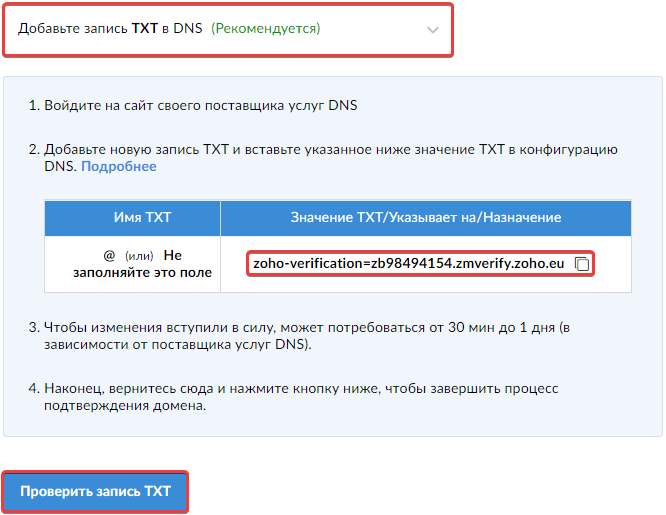
- Add new record with the following data:
- "Subdomain" — if a subdomain was added, then its name; if the service is intended to be used for the main domain, the symbol
@. - "Type" — "TXT".
- "Data" — copied data.
- Wait for the DNS cache to update. This usually takes several hours (up to 24). After that, click "Check TXT record."
Verify using CNAME record
- Select the confirmation method "CNAME" and use the values from the fields "Name/Host/Alias/CNAME" and "Value/Points to/Destination":
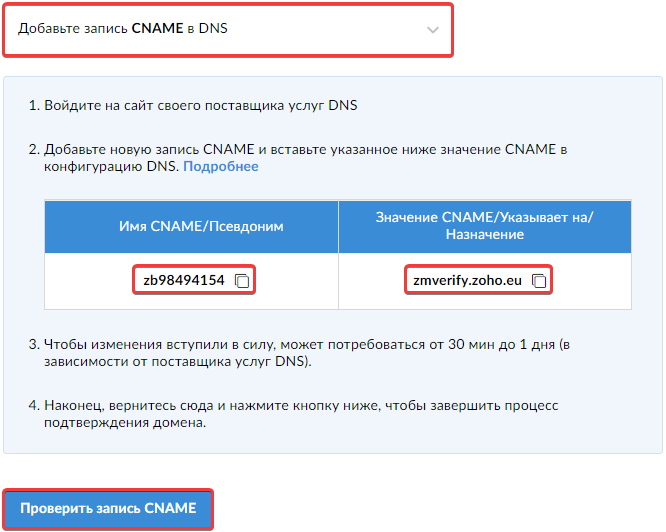
- Add new record with the following data:
- "Subdomain" — data from the field "Name/Node/Alias/CNAME".
- "Type" — "CNAME".
- "Data" — data from the field "Value/Indicates/Assignment".
- Wait for the DNS cache to update. This usually takes several hours (up to 24). After that, click "Confirm with CNAME."
Verify using HTML file
Attention!
To confirm the domain using this method, you must have access to the files on the server to which the domain is directed, and the site must be operational, correctly processing requests.- Select the confirmation method "HTML":
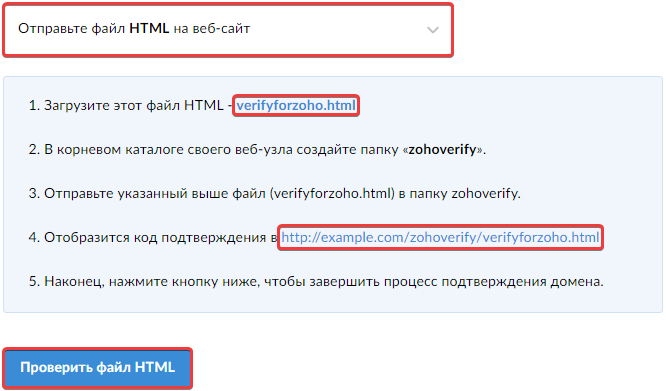
- Download the file marked under the first link.
- Upload the file to the root directory of your site. This can be done using the file manager or any FTP client.
- Check the availability of the file via the second link marked in the screenshot.
- If the file is available, click "Check with HTML".